워드프레스 포스트 유형 추가 예제
워드프레스 포스트 형태에는 글, 페이지, 미디어파일, 댓글 등 다양한 유형이 있습니다.
기본적으로 제공되는 포스트 유형 외에 새로운 포스트를 생성하는 방법에 대해서 설명 드리고, 템플릿 페이지를 개발하여 어떻게 새로운 유형의 포스트를 보여줄 수 있는지 알려드리도록 하겠습니다. 이번 글에 사용된 예제 소스코드는 아래의 명령어로 다운 받으실 수 있습니다.
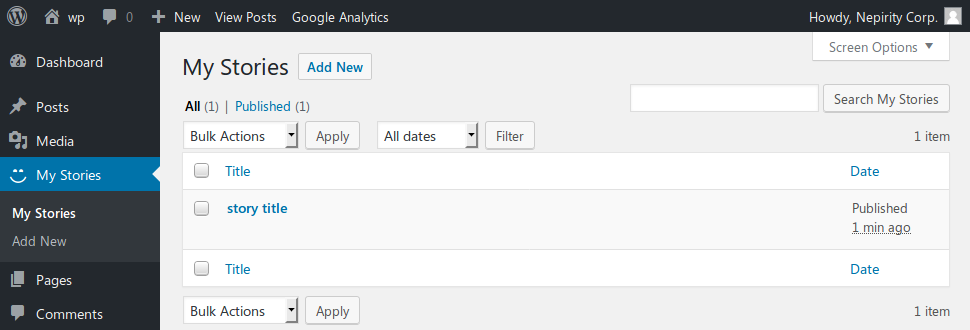
$ git clone https://hiseon.me/reps/wordpress-custom-post-type.git예제 소스코드를 실행한 결과 화면은 다음과 같습니다.

관리자 메뉴에 대한 자세한 예제는 아래의 글을 참고해 주시기 바랍니다.
1. 플러그인 파일
먼저 예제로 사용할 플러그인 파일을 생성합니다. 파일이름은 wordpress-custom-post-type.php 으로 하여 아래와 같은 내용의 플러그인 정보를 입력합니다.
/*
 * Plugin Name: WordPress Custom Post Type
 * Description: 포스트 유형 추가 예제 플러그인
 * Version:   1.0.0
 * Author:    HiSEON
 * Author URI:  https://hiseon.me/
 */
포스트 유형 추가
아래의 내용과 같이 register_post_type 함수를 호출하여 새로운 포스트 유형을 추가합니다.
function create_my_story() {
  register_post_type('my_stories',
    array(
      'labels' => array(
        'name' => 'My Stories',
        'singular_name' => 'My Story',
        'add_new' => 'Add New',
        'add_new_item' => 'Add New My Story',
        'edit' => 'Edit',
        'edit_item' => 'Edit My Story',
        'new_item' => 'New My Story',
        'view' => 'View',
        'view_item' => 'View My Story',
        'search_items' => 'Search My Stories',
        'not_found' => 'No My Stories found',
        'not_found_in_trash' => 'No My Stories found in Trash',
        'parent' => 'Parent My Story'
      ),

      'public' => true,

      'menu_position' => 15,
      'supports' => array('title', 'editor'),
      /* 'supports' => array('title', 'editor', 'comments', 'thumbnail', 'custom-fields'), */
      'taxonomies' => array(''),
      'menu_icon' => 'dashicons-smiley',
      'has_archive' => true
    )
  );
}

add_action('init', 'create_my_story');
supports는 값에 배열로 여려가지 내용이 추가되는데 내용 수정 페이지에서 어떤 항목들을 사용할지 나타내는 내용입니다.
register_post_type 에 대한 자세한 내용은 아래의 페이지를 참고하실 수 있습니다.
https://codex.wordpress.org/Function_Reference/register_post_type
참고로 View 기능을 제거하기 위해서는 register_post_type함수를 호출할 때 ‘publicly_queryable’ 값을 false 으로 추가해 주시면 됩니다. 그리고 Add New 기능을 제거하기 위해서는 아래의 내용을 함께 추가해 주시면 됩니다.
array(
  'capability_type' => 'post',
  'capabilities' => array(
    'create_posts' => 'do_not_allow',
  ),
  'map_meta_cap' => true
);
메타 박스(meta box) 추가
추가된 포스트 유형에서 컨텐츠를 작성하거나 수정하는 경우, 기본적으로 제공되는 내용을 사용할 수 있습니다.
그리고 직접 메타박스를 만들어서 추가적인 기능을 구현 하실 수 있습니다. 아래의 내용은 컨텐츠를 작성 하는 내용에서 메모와 점수를 추가하는 내용입니다.
function my_admin() {
  add_meta_box('my_story_meta_box',
    'My Story Details',
    'display_my_story_meta_box',
    'my_stories', 'normal', 'high'
  );
}

add_action('admin_init', 'my_admin');

function display_my_story_meta_box($my_story) {
  $story_memo = esc_html(get_post_meta($my_story->ID, 'story_memo', true));
  $story_rating = intval(get_post_meta($my_story->ID, 'story_rating', true));
?>
  <table>
    <tr>
      <td style="width: 100%">Story Memo</td>
      <td><input type="text" size="80" name="my_story_memo" value="<?php echo $story_memo; ?>" /></td>
    </tr>
    <tr>
      <td style="width: 150px">Story Rating</td>
      <td>
        <select style="width: 100px" name="my_story_rating">
          <?php for ($rating = 5; $rating >= 1; $rating --) { ?>
            <option value="<?php echo $rating; ?>" <?php echo selected($rating, $story_rating); ?>>
              <?php echo $rating; ?> stars
            </option>
          <?php } ?>
        </select>
      </td>
    </tr>
  </table>
<?php
}
메타 박스(meta box) 데이터 저장
기본적으로 추가된 메타박스 데이터는 저장되지 않습니다. 따라서 아래의 action 함수를 추가하여, 직접 정의된 데이터가 저장될 수 있도록 구현합니다.
add_action('save_post', 'add_my_story_fields', 10, 2);

function add_my_story_fields($my_story_id, $my_story) {
  if ($my_story->post_type == 'my_stories') {
    if (isset($_POST['my_story_memo']) && $_POST['my_story_memo'] != '') {
      update_post_meta($my_story_id, 'story_memo', $_POST['my_story_memo']);
    }
    if (isset($_POST['my_story_rating']) && $_POST['my_story_rating'] != '') {
      update_post_meta($my_story_id, 'story_rating', $_POST['my_story_rating']);
    }
  }
}
2. 템플릿 페이지
위의 컨텐츠 내용이 워드프레스 페이지에 보여지기 위해서는 먼저 페이지를 생성해야 합니다.
워드프레스 관리자 페이지에서 my_stories 주소를 갖는 페이지를 생성합니다.
그리고 이제까지 작업 하던 wordpress-custom-post-type.php 파일에 아래의 내용을 추가합니다.
function include_template_function($template_path) {
  if (get_post_type() == 'my_stories') {
    if (is_single()) {
      if ($theme_file = locate_template(array ('single-my_stories.php'))) {
        $template_path = $theme_file;
      } else {
        $template_path = plugin_dir_path(__FILE__) . '/single-my_stories.php';
      }
    }
  }
  return $template_path;
}

add_filter('template_include', 'include_template_function', 1);
위의 내용은 템플릿 파일을 가리키는 것으로 플러그인 디렉토리 안에서 single-my_stories.php 파일을 참조 할 수 있도록 설정하는 내용입니다.
템플릿 파일 생성
플러그인 디렉토리 또는 현재 사용중인 테마 디렉토리 내부에 single-my_stories.php 파일을 생성하여 아래와 같은 내용을 작성합니다.
<?php get_header(); ?>
<div id="primary">
    <div id="content" role="main">
     <?php $mypost = array( 'post_type' => 'my_stories', );
      $loop = new WP_Query( $mypost ); ?>

      <?php while ( $loop->have_posts() ) : $loop->the_post();?>
          <article id="post-<?php the_ID(); ?>" <?php post_class(); ?>>
              <header class="entry-header">
                 <div style="float: top; margin: 10px">
                    <?php the_post_thumbnail( array( 100, 100 ) ); ?>
                 </div>

                 <strong>Title: </strong><?php the_title(); ?><br />
                 <strong>Memo: </strong>
                 <?php echo esc_html( get_post_meta( get_the_ID(), 'story_memo', true ) ); ?>
                 <br />
                <strong>Rating: </strong>
                <?= intval( get_post_meta( get_the_ID(), 'story_rating', true ) ); ?>
              </header>
              <div class="entry-content">
                   <?php the_content(); ?>
              </div>
              <hr/>
         </article>
   <?php endwhile;  ?>
   </div>
</div>
<?php wp_reset_query(); ?>
<?php get_footer(); ?>
( 본문 인용시 출처를 밝혀 주시면 감사하겠습니다.)