MySQL Replication 구성
우분투 환경에서 MySQL Replication 구성 방법에 대해서 설명 드립니다. Master 노드와 Slave 노드로 구성되며, MySQL 서버 이중화 및 백업 용도로 활용 하실 수 있습니다.
Replication 는 복제라는 사전적 의미를 갖고 있습니다. MySQL Replication은 MySQL 마스터 노드의 데이터베에스를 복사하여 Slave를 구성하는 방식입니다. Master Server와 Slave Server는 비동기 방식으로 최신의 데이터를 유지하게 됩니다.
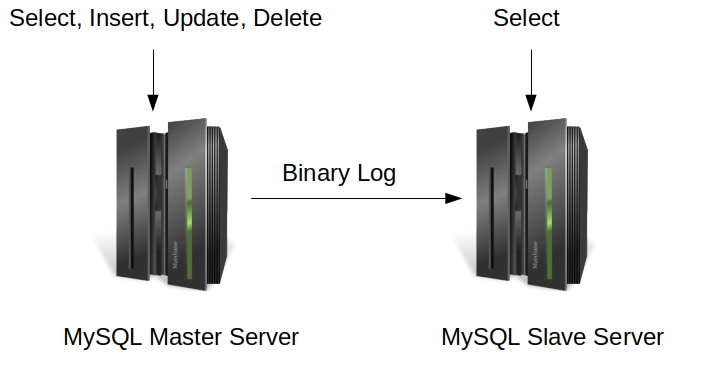
위의 이미지는 단방향으로 MySQL Replication을 구성 방법을 나타낸 것입니다. Master 노드에서는 데이터가 추가, 수정, 삭제되는 쿼리를 처리 할 수 있지만 Slave 서버는 단순히 Select 만 처리 할 수 있습니다. 부하 분산의 목적으로 사용하거나 백업 용도로 구성할 수 있습니다.
Slave 서버에서 함께 데이터를 추가, 수정, 삭제 되도록 설정하기 위해서는 양방향으로 Replication 을 설정해 주시거나 Cluster 로 구성해 주셔야 합니다. 이번 글에서는 위의 구성도 처럼 단방향 MySQL Replication으로 구성하는 방법으로 설명 드리도록 하겠습니다.
환경
우분투 18.04 환경을 기준으로 설명드리도록 하겠습니다. 우분투의 다른 버전을 사용하시거나, 다른 배포판을 사용하시더라도 설정은 크게 다르지 않을 것이라 생각됩니다.
만약 MySQL Server 가 설치되지 않았을 경우 아래의 명령어로 Master Server와 Slave Server 모두 설치해 주시기 바랍니다.
$ sudo apt-get update && sudo apt-get install -y mysql-server mysql-clientMySQL Replication Master 설정
먼저 Master 서버를 설정 하도록 하겠습니다.
/etc/mysql/mysql.conf.d/mysqld.cnf 파일을 열고, Slave 접속을 허용하기 위해서 bind-address 부분을 주석 처리 합니다.
bind-address 부분을 주석처리하면 모든 인터페이스의 IP 주소로부터 접속을 허용하게 됩니다.
# The following can be used as easy to replay backup logs or for replication.
# note: if you are setting up a replication slave, see README.Debian about
#       other settings you may need to change.
#server-id              = 1
#log_bin                        = /var/log/mysql/mysql-bin.log
expire_logs_days        = 10
max_binlog_size   = 100M
#binlog_do_db           = include_database_name
#binlog_ignore_db       = include_database_name
그리고, 위의 내용을 아래와 같이 수정합니다.
# The following can be used as easy to replay backup logs or for replication.
# note: if you are setting up a replication slave, see README.Debian about
#       other settings you may need to change.
server-id               = 1
log_bin                 = /var/log/mysql/mysql-bin.log
expire_logs_days        = 10
max_binlog_size   = 100M
binlog_do_db            = www
#binlog_ignore_db       = include_database_name
server-id 값을 지정하였고, 로그 파일이 저장될 경로를 지정하였습니다. 그리고, Slave 서버와 동기화 되게 될 DB 를 지정합니다.
그리고 다음 명령어를 사용하여 MySQL Server 를 다시 실행합니다.
$ sudo /etc/init.d/mysql restartMySQL 클라이언트 프로그램을 사용하여 다음과 같이 서버에 접속합니다. mysql 프롬프트를 편의상 master-mysql 과 slave-mysql 으로 구분하여 표기하였습니다.
$ mysql -u root -p
Enter password:
Welcome to the MySQL monitor.  Commands end with ; or \g.
Your MySQL connection id is 4
Server version: 5.7.24-0ubuntu0.18.04.1-log (Ubuntu)

Copyright (c) 2000, 2018, Oracle and/or its affiliates. All rights reserved.

Oracle is a registered trademark of Oracle Corporation and/or its
affiliates. Other names may be trademarks of their respective
owners.

Type 'help;' or '\h' for help. Type '\c' to clear the current input statement.

master-mysql>
Slave Server에서 사용할 계정을 Master Server에서 생성하고 동기화 할 DB를 함께 생성합니다.
master-mysql> create database www;
Query OK, 1 row affected (0.00 sec)

master-mysql> GRANT REPLICATION SLAVE ON *.* TO 'slaveuser'@'%' IDENTIFIED BY 'password';
Query OK, 0 rows affected, 1 warning (0.00 sec)

master-mysql> FLUSH PRIVILEGES;
Query OK, 0 rows affected (0.01 sec)
그리고 가장 중요한 로그파일의 이름과 위치 정보를 다음과 같이 확인 합니다.
master-mysql> SHOW MASTER STATUS;
+------------------+----------+--------------+------------------+-------------------+
| File             | Position | Binlog_Do_DB | Binlog_Ignore_DB | Executed_Gtid_Set |
+------------------+----------+--------------+------------------+-------------------+
| mysql-bin.000001 |      750 | www          |                  |                   |
+------------------+----------+--------------+------------------+-------------------+
1 row in set (0.00 sec)
위에서 확인된 mysql-bin.000001 파일명과 위치 값인 750은 Master 서버와 처음으로 동기화 할 때 필요한 값입니다.
파일명과 위치값은 데이터베이스 내의 데이터가 수정될 때마다 변경될 수 있습니다. 따라서 Master 노드에서 데이터베이스가 업데이트 되고 있는 상황일 경우 데이터베이스에 LOCK 을 걸어서 작업을 진행하셔야 하고 Slave 노드에서 동기화 작업이 끝난 다음 LOCK을 해제해 주셔야 합니다.
위의 내용은 데이터 수정이 이뤄지지 않는 상황이라는 가정 하에 LOCK을 걸지 않고, 설명드립니다.
MySQL Replication Slave 설정
다음은 Slave 서버를 설정하도록 하겠습니다.
# The following can be used as easy to replay backup logs or for replication.
# note: if you are setting up a replication slave, see README.Debian about
#       other settings you may need to change.
#server-id              = 1
#log_bin                        = /var/log/mysql/mysql-bin.log
expire_logs_days        = 10
max_binlog_size   = 100M
#binlog_do_db           = include_database_name
#binlog_ignore_db       = include_database_name
/etc/mysql/mysql.conf.d/mysqld.cnf 파일을 열고 위의 내용을 아래와 같이 수정합니다.
# The following can be used as easy to replay backup logs or for replication.
# note: if you are setting up a replication slave, see README.Debian about
#       other settings you may need to change.
server-id               = 2
log_bin                 = /var/log/mysql/mysql-bin.log
relay-log               = /var/log/mysql/mysql-relay-bin.log
expire_logs_days        = 10
max_binlog_size   = 100M
binlog_do_db            = www
#binlog_ignore_db       = include_database_name
그리고 다음 명령어를 사용하여 MySQL Server 를 다시 실행합니다.
$ sudo /etc/init.d/mysql restart다음은 MySQL Slave 노드에 접속 후, 아래의 명령어로 동기화될 데이터베이스를 생성합니다.
slave-mysql> create database www;
Query OK, 1 row affected (0.01 sec)
그리고 Slave 노드에서 Master 노드 정보를 설정해 주셔야 합니다. 아래의 쿼리는 Master 서버의 아이피 정보, 그리고 로그파일 이름, 로그파일 위치등을 정확하게 지정해 주셔야 합니다.
위에서 확인한 내용으로 수정한 다음 입력해 주시면 됩니다.
slave-mysql> CHANGE MASTER TO MASTER_HOST='172.17.0.2',MASTER_USER='slaveuser', MASTER_PASSWORD='password', MASTER_LOG_FILE='mysql-bin.000001', MASTER_LOG_POS=  750;
Query OK, 0 rows affected, 2 warnings (0.08 sec)

slave-mysql> START SLAVE;
Query OK, 0 rows affected (0.00 sec)
마지막으로 설정된 Slave 상태를 확인해 보도록 하겠습니다. 다음 명령어로 Slave 상태를 확인 합니다.
slave-mysql> SHOW SLAVE STATUS\G;
*************************** 1. row ***************************
               Slave_IO_State: Waiting for master to send event
                  Master_Host: 172.17.0.2
                  Master_User: slaveuser
                  Master_Port: 3306
                Connect_Retry: 60
              Master_Log_File: mysql-bin.000001
          Read_Master_Log_Pos: 750
               Relay_Log_File: mysql-relay-bin.000002
                Relay_Log_Pos: 320
        Relay_Master_Log_File: mysql-bin.000001
             Slave_IO_Running: Yes
            Slave_SQL_Running: Yes
              Replicate_Do_DB:
          Replicate_Ignore_DB:
           Replicate_Do_Table:
       Replicate_Ignore_Table:
      Replicate_Wild_Do_Table:
  Replicate_Wild_Ignore_Table:
                   Last_Errno: 0
                   Last_Error:
                 Skip_Counter: 0
          Exec_Master_Log_Pos: 750
              Relay_Log_Space: 527
              Until_Condition: None
               Until_Log_File:
                Until_Log_Pos: 0
           Master_SSL_Allowed: No
           Master_SSL_CA_File:
           Master_SSL_CA_Path:
              Master_SSL_Cert:
            Master_SSL_Cipher:
               Master_SSL_Key:
        Seconds_Behind_Master: 0
Master_SSL_Verify_Server_Cert: No
                Last_IO_Errno: 0
                Last_IO_Error:
               Last_SQL_Errno: 0
               Last_SQL_Error:
  Replicate_Ignore_Server_Ids:
             Master_Server_Id: 1
                  Master_UUID: a09538ad-e346-11e8-bf1b-0242ac110002
             Master_Info_File: /var/lib/mysql/master.info
                    SQL_Delay: 0
          SQL_Remaining_Delay: NULL
      Slave_SQL_Running_State: Slave has read all relay log; waiting for more updates
           Master_Retry_Count: 86400
                  Master_Bind:
      Last_IO_Error_Timestamp:
     Last_SQL_Error_Timestamp:
               Master_SSL_Crl:
           Master_SSL_Crlpath:
           Retrieved_Gtid_Set:
            Executed_Gtid_Set:
                Auto_Position: 0
         Replicate_Rewrite_DB:
                 Channel_Name:
           Master_TLS_Version:
1 row in set (0.00 sec)
Slave_IO_State, Slave_SQL_Running_State 등의 내용을 확인해 주시면 됩니다.
MySQL Replication 동기화 테스트
설정된 데이터베이스에서 실제 Master 서버와 Slave 서버가 동기화 되는지 한 번 테스트 해보도록 하겠습니다. Master 서버에서 아래의 테이블을 생성해 주시고, 데이터를 저장합니다.
master-mysql> use www;
Database changed
master-mysql> create table study (no int auto_increment primary key, memo text);
Query OK, 0 rows affected (0.07 sec)

master-mysql> insert into study set memo ='hi';
Query OK, 1 row affected (0.02 sec)

master-mysql> select * from study;
+----+------+
| no | memo |
+----+------+
|  1 | hi   |
+----+------+
1 row in set (0.00 sec)
테이블을 생성하고, 레코드를 저장한 뒤에 쿼리를 질의해 봤습니다. 다음은 Slave 노드에서 아래의 쿼리를 실행합니다.
slave-mysql> use www;
Database changed
slave-mysql> select * from study;
+----+------+
| no | memo |
+----+------+
|  1 | hi   |
+----+------+
1 row in set (0.00 sec)
Master Server에서 생성하고 저장한 레코드가 Slave 노드에서도 동일하게 확인 되는 것을 알 수 있습니다.
( 본문 인용시 출처를 밝혀 주시면 감사하겠습니다.)